This guide adds the MR Stash side to a working Stash server. First the required compose changes that expose the sidecar port and install its Python dependencies, then the MR Stash plugin repo as a source, and finally the companion plugin installed from it. Haven't set up Stash yet? Start with Guide 1.
Order matters here. The compose changes come first because the plugin's sidecar crashes on start if its port and dependencies aren't in place. Get the backend right, then install the plugin.
You'll need: a running Stash instance you can administer, and access to the host where Stash runs so you can edit its docker-compose.yml and recreate the container.
What is DeviceAuth?
MR Stash DeviceAuth (github) is an open-source sidecar service for Stash.
The primary goal of DeviceAuth, is to prevent needing to login with a password, or needing to write in an api key. But it also does a little more.
The sidecar also handles some additional functions for performance reasons, like the dynamic creation of resized thumbnails, which improves the performance of the in-app Stash browser.
DeviceAuth is COMPLETELY OPTIONAL. You can log in with a user/pass. It's just a nice-to-have.
How the pieces fit together
MR Stash adds two things to your server: a companion plugin that runs inside Stash, and a small sidecar service the plugin brings up on its own port. Your headset talks to the sidecar at your Stash address on that port; the sidecar registers your device and the plugin's UI lets you approve it.
The sidecar is written in Python and needs a few libraries that aren't in the stock Stash image. Rather than build a custom image, the compose file installs them on container start - that's the required change in step 0 below, and it has to be in place before the plugin runs.
Required compose changes
Already did this in Guide 1? If you chose the "With DeviceAuth support" setup there, your compose already has everything below - skim the highlighted lines to confirm, then skip ahead to step 1.
Do this before installing the plugin. The sidecar needs its port published and its Python dependencies present, and the plugin crashes on start if they're missing. Three additions to your docker-compose.yml: publish the sidecar port so the headset can reach it, run privileged so the plugin can manage its service, and an entrypoint that installs the dependencies (flask, requests, pyyaml, Pillow) before launching Stash. The highlighted lines are the additions:
version: '3.4'
services:
  stash:
    image: stashapp/stash:latest
    container_name: stash
    restart: unless-stopped
    # NEW - lets the plugin manage its sidecar service
    privileged: true
    ports:
      # Stash web UI
      - "9999:9999"
      # NEW - sidecar port for MR Stash device communication
      - "9997:9997"
    logging:
      driver: "json-file"
      options:
        max-file: "10"
        max-size: "2m"
    environment:
      - STASH_STASH=/data/
      - STASH_GENERATED=/generated/
      - STASH_METADATA=/metadata/
      - STASH_CACHE=/cache/
      - STASH_PORT=9999
    # NEW - install sidecar deps on start, then run Stash
    entrypoint:
      - /bin/sh
      - -c
      - |
        python3 -c "import flask, requests, yaml, PIL" 2>/dev/null \
          || pip3 install --break-system-packages --root-user-action=ignore --quiet flask requests pyyaml Pillow
        exec stash
    volumes:
      - /etc/localtime:/etc/localtime:ro
      - ./config:/root/.stash
      - ${STASH_PATH}:/data
      - ./metadata:/metadata
      - ./cache:/cache
      - ./blobs:/blobs
      - ./generated:/generated
What each addition does:
- Sidecar port 9997:9997 - publishes the port your headset connects to. Pick any free host port if 9997 is taken, but keep the two numbers matched unless you know why you're remapping.
- privileged: true - grants the container the access the plugin needs to run and manage its sidecar process.
- The entrypoint checks whether flask, requests, yaml, and PIL import cleanly; if not, it installs flask requests pyyaml Pillow, then hands off to Stash. It's a no-op on restarts once the deps are present.
After editing, recreate the container so the changes take effect - a plain restart won't pick up compose changes:
docker compose up -d
The dependencies install into the running container, so they're reinstalled if you recreate it from scratch (a few seconds on start). If your host has no internet access, the install step will fail - the container needs to reach the Python package index the first time.
Running behind a reverse proxy? Make sure the sidecar port is reachable from your headset's network too - either proxied on its own route or opened directly on the LAN.
Add the MR Stash plugin repo
With the backend ready, add the plugin. Stash installs plugins from source URLs, so first add the MR Stash repo as a source - this is a UI action, no file editing:
- In Stash, go to Settings → Plugins.
- Under Available Plugins, choose Add Source.
- Paste the MR Stash manifest URL below and save, then refresh the available plugins list.
# MR Stash plugin manifest
https://mrtoadx.github.io/MRStashRepository/main/index.yml
Confirm this is the current manifest URL for your published repo before shipping - it's the one address users must get exactly right.
Install the companion plugin
With the source added, the MR Stash companion plugin appears in the available list:
- Find the MR Stash companion plugin under Available Plugins and click Install.
- After it installs, confirm it shows as enabled in the installed plugins list.
Because you did the compose changes in step 0, the sidecar's port and dependencies are already in place - the plugin has what it needs to start cleanly.
Verify with the status icon
Once the plugin is installed, refresh the Stash page. The refresh is what injects the plugin's UI into Stash - until you reload, the status icon won't appear. After reloading, look for the device auth icon in the top navigation bar; its color tells you exactly where the sidecar is in its startup.
Click the icon at any time to open its modal, which shows the current state in more detail. You want it to walk from red to yellow to green:
Red - offline
The freshly injected UI is trying to reach the sidecar, either directly on its port or by asking Stash to start the plugin task that spins it up. This is the expected first state right after a refresh.

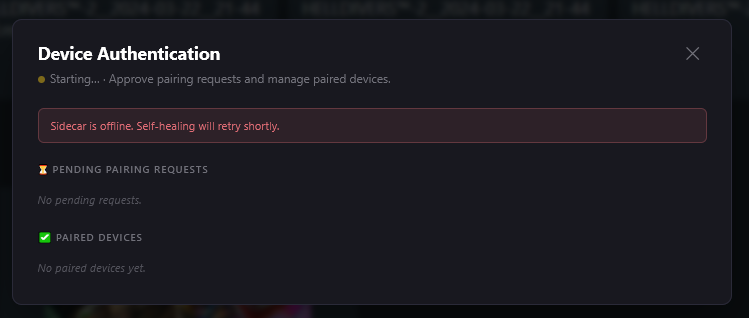
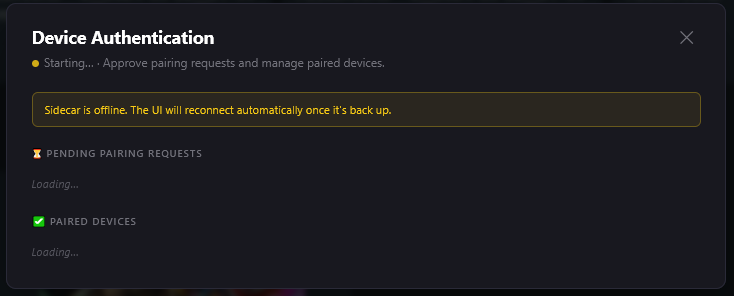
Yellow - waiting
The plugin start has been requested and the UI is waiting for the sidecar to come up. Reaching yellow means the request went through; the icon should move to green within a few seconds once the sidecar answers.

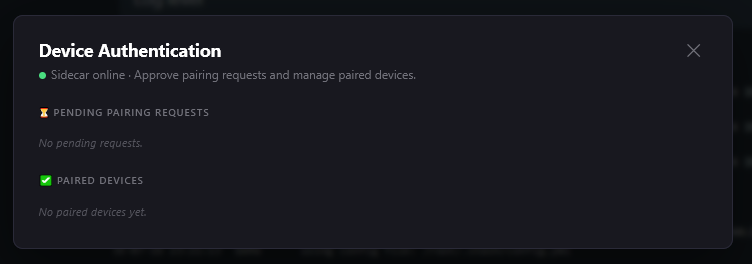
Green - connected
The sidecar is up and the UI is talking to it. Everything's healthy - you're ready to pair your headset.

Green on the first try? You're done here - skip the troubleshooting below and head to Guide 3. Stuck on red or yellow? The next section breaks down what each one means.
Troubleshooting the status icon
The color where the icon gets stuck tells you where to look. Work from whichever state you're stuck on.
Stuck on red - never reaches yellow
If the icon stays red and never advances to yellow, the plugin never got as far as requesting a start. Because the plugin UI runs in the browser, the failure is usually on the client side:
- Open your browser dev console (F12 → Console) and look for errors from the plugin's JavaScript - a script that failed to load or threw on init will keep you on red.
- Check the container logs with docker compose logs stash to confirm the plugin loaded server-side.
- Confirm you actually refreshed the page after installing - without a reload, the plugin JS never gets injected.
Stuck on yellow - never reaches green
Yellow means the start was requested but the sidecar never came up. The plugin retries on a loop, so a sidecar that keeps failing to start will spam the logs with repeated attempts - which is exactly where the real error is.
- In Stash, go to Settings → Logs and read the repeating entries. The retry loop surfaces the underlying failure - a missing dependency, a port conflict, or a permissions error.
- Cross-check the compose changes from step 0: the sidecar port published, privileged: true set, and the dependency-install entrypoint present. A missing piece here is the most common cause.
- If you changed compose to fix it, recreate the container (docker compose up -d) and refresh the page again.
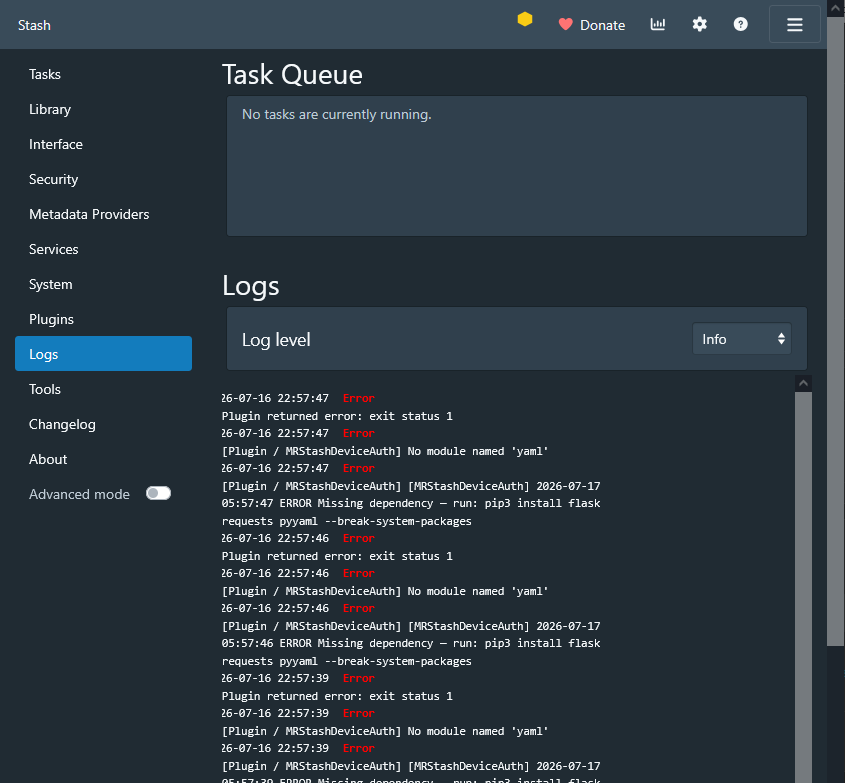
Settings → Logs: a stuck sidecar shows up as a repeating loop of start attempts.
A common version of this looks like the log below - the plugin can't import one of its Python dependencies, so it exits and the loop retries:
Error   Plugin returned error: exit status 1
Error   [Plugin / MRStashDeviceAuth] No module named 'yaml'
Error   [Plugin / MRStashDeviceAuth] [MRStashDeviceAuth] ERROR Missing dependency - run: pip3 install flask requests pyyaml --break-system-packages
Seeing this? The sidecar's dependencies aren't installed. The clean fix is the step 0 compose changes, which install them automatically on start - add them and recreate the container. To patch it by hand instead, run the install inside the running container:
docker compose exec stash pip3 install flask requests pyyaml Pillow --break-system-packages
Either way, refresh the Stash page afterward so the plugin retries against the now-satisfied dependencies.